Our day-to-day work is are highly intertwined and many companies operate globally. Teams are becoming more diverse and it matters less and less whether you work out of the office in Hofheim, Paris, Thessaloniki or the wilderness of Canada. In addition, more and more employees speak fluent English. However, there is still a need for information in the local language. And this is precisely the issue we are addressing today within the SAP Analytic Cloud, both professionally and technically.
Simply English
For dashboards that are used internationally, one could of course take the route of offering them only in English. Depending on the scenario, this is also a legitimate decision and saves work, reduces the potential for errors as well as the maintenance effort.
Certainly, it depends on the target group of the dashboard and how intensively it will be used. While management and status dashboards can be offered in English only, operational dashboards are usually a different story. Especially if the dashboard is accompanied by a new process implementation and substitutes the previous reporting solutions. Of course, it becomes even more difficult to introduce a purely English dashboard if the user base is uncomfortable with the English language. In the best case only minor misunderstandings occur, in the worst case numbers are misinterpreted or users build their own solution in Excel. Thus, the new dashboard is bypassed and with it possibly the new process. To avoid this, a translation can be quite useful.
SAC Language Options
In the profile settings of SAC it is possible to customize the language. If you were hoping that this would solve all your problems, I'm afraid you're in for a disappointment. Via the user icon in the upper right corner, the profile settings can be called up and the language as well as the data access language can be adjusted.
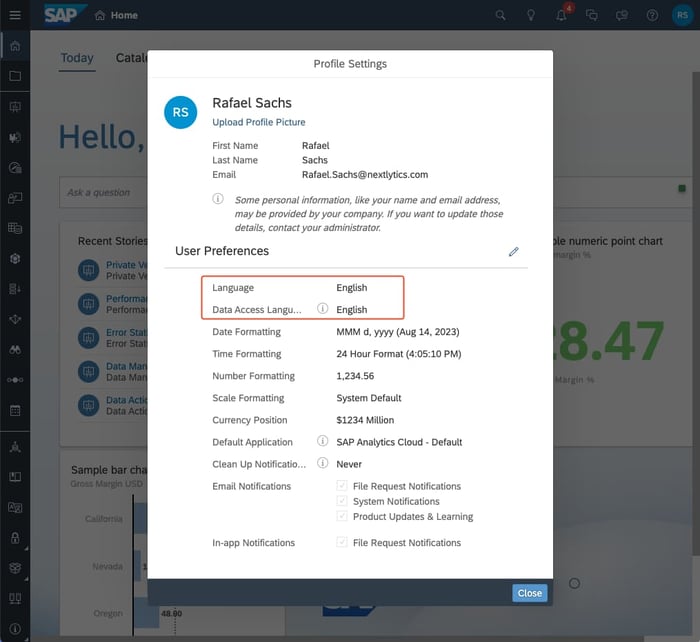
Profile settings in the SAP Analytics Cloud
The language defines the SAC language settings. This includes, for example, all menus or help texts within the SAC.
The data access language defines in which language the contents of the stories are displayed. Here you have to distinguish between master data, technical objects as well as elements and texts within the SAC.
Technical data can be, for example, when using SAP BW, names of InfoObjects, queries, but also of individual elements, such as locally created key figures in the query. Master data, on the other hand, are the master data entries in the respective local language.
Therefore, some of the translation work must already be done in the source. While master data is usually also available for various language keys, this is often not the case with technical names.
Excursus: Translation of objects in BW
Basically, there is a correct way to translate objects in SAP BW. Detailed instructions can be found in the SAP Help Portal. For individual cases, there is a small workaround. Simply log into Eclipse or SAP HANA Studio in the language to be translated and add the appropriate description for the objects as well as elements of the query, which will only have a technical name at that time.
SAP Analytics Cloud Multilingual
After making sure that our master data, object and element names are available in the required languages, we can move on to translation within SAC.
Translations within the SAC are not stored directly in the story. There is also no workaround here to simply log in with the languages to be translated, since the texts used in the SAC do not have a language key. Thus, a story can only be saved in one language at a time. Of course, it is possible to create a separate story for each language, but this would lead to unnecessary maintenance effort. Instead, the translation function within the SAC should be used.
Step 1: Permissions
The translation function has its own tab within the SAC page menu and is not available to every user, as access is restricted via permissions. The translator necessarily needs permission to create a translation.

Configuring the permissions within the SAC
Dashboarding with SAP Analytics Cloud -
Download our Whitepaper here!
Step 2: Prepare a story for translation
Next, we need to decide which language is the leading language in the SAC Story, because this is the starting point for all translations. So in our case, the story will be created in English. This means that all our texts that do not come from the source will be written in English.
Then the story has to be approved for translation. This is done within the settings of the respective story. The translation can then be activated in the popup.
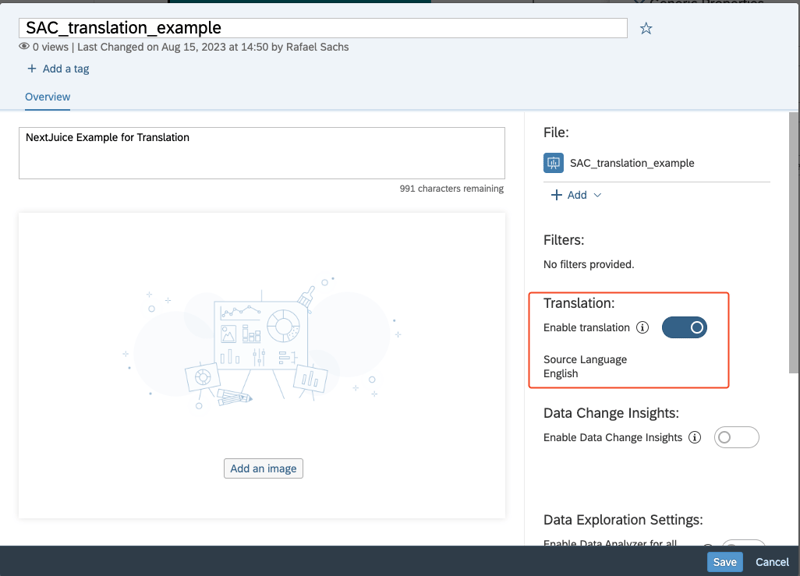 Activate translation in the story settings
It is important to note that the SAC data access language set by the user is always used as the source language for this story. After activating the translation function, a story can only be edited in its source language.
Step 3: Create translation
Once the story is activated for translation, it will appear in the translation menu.
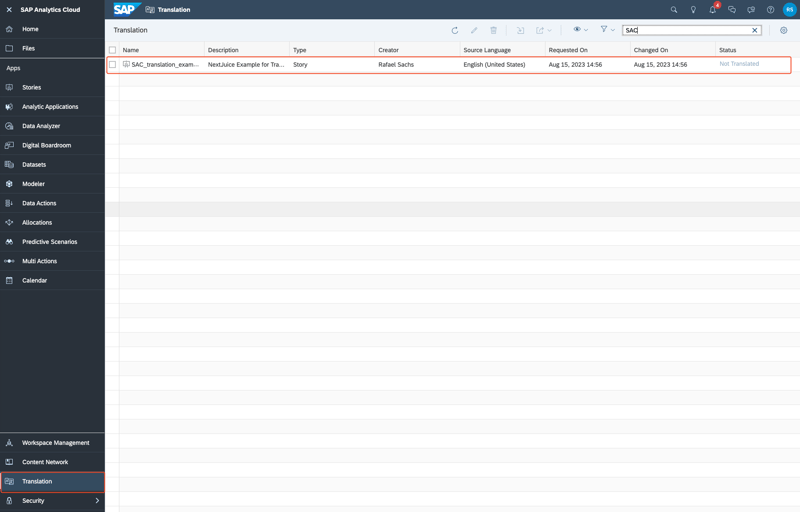
Selecting the story in the translation menu
Option 1: SAC translation input screen
In the translation menu, the story can be selected and the translation is created or revised using the pencil icon.
The SAC creates a complete list of all texts to be translated. Not only pure text fields, headlines and status messages are listed, but also all customized widget texts. Before we enter the translations, the target language must be selected. Only one translation can be created per target language. Some fields contain style tags, these should be included to avoid graphical differences between languages. To simplify this, you can click on the copy icon next to the active input field.

The translation input screen offers a copy symbol for the active field
After all or only some of the fields have been translated and saved, the story can be opened in the translated language.
Option 2: Translation using XLIFF files
While the translation input screen is quite sufficient for smaller translations, translating larger stories into multiple languages can quickly become tedious. Therefore, there is the possibility to import the whole translation via an XLIFF file. XLIFF stands for XML Localization Interchange File Format.
In addition to the pen icon, the translation menu also contains an import and export function. The source XLIFF file is downloaded via export and can be edited in the appropriate editor.
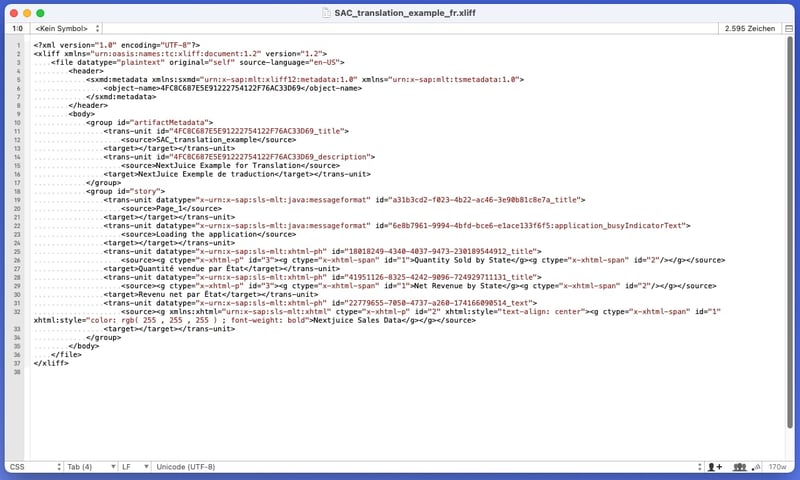
Structure of the XLIFF file
XLIFF files can be used for exchange with a translation agency, for other translation tools or also for fully automatic translation with DeepL, for example.
The result is a new XLIFF file with the translations and the structure required for the SAC. When uploading, make sure that the file name contains the appropriate language abbreviation, in our case "_fr" for French.

Import of translation files
Unfortunately, multiple translations cannot be saved in one file. In the upload menu all translated files can be selected and imported together. However, creating translation files only makes sense if a translation program or service is available. With a manual translation, the effort is much higher than the direct way via the SAC translation input screen. Once uploaded, translations can also be edited directly in SAC for minor future adjustments.
SAC Translation - Our Conclusion
Even if the translation is not technically witchcraft, the effort is higher than some would expect. In addition, adjustments to texts within the story must also be made in all languages and the source system must contain the master data available in the respective language. Whether a translation makes sense always depends on the individual case. If the translation into the respective language is critical for the acceptance of the reporting, we recommend not shying away from the extra work in order to offer the user the best possible reporting experience.
Do you have questions about this or other topics? Are you trying to build up the necessary know-how in your department or do you need support with a specific question? We will be happy to help you. Request a non-binding consulting offer today.
SAP Analytics Cloud, Dashboarding


